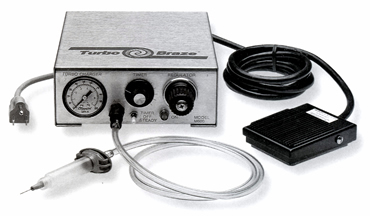
Features:
- Controlled Cartridge/Syringe Paste Output
- Excellent repeatability for consistent results
- Easy dispensing of thick materials
- Easy foot pedal actuation
- Pulsed or Continuous Operation
- Stainless Steel Case
- 0-2.5 second timed cycle
- Solid State Controls
Needs:
- Compressed air source
- 5 micron filter/regulator
- Electrical source (110v Standard, 220v Optional)
- 6.5" Wide, 11.5" Deep, 2.5" High
|
 |
|
With electrical power plugged in, a filtered plant air supply connected, and the Function Switch toggle in the "Timer" position, actuation of the Footswitch sets the Timer into operation. The Air Solenoid opens, allowing Air Regulator Controlled air to flow through the Air Connection. This regulated air, when properly connected will cause brazing/soldering paste to flow out the dispensing Tip of a Syringe/Cartridge. When the time setting of the Timer is reached, the Air Solenoid is shut off, thereby stopping all paste flow. If the Function Switch is in the "Steady" position, flow of regulated air and, therefore, paste flow continues as long as the Footswitch is depressed.
The M600 paste dispenser is designed for use with syringe and semco cartridge packaging. The standard unit is packaged as a kit with a 10cc and 30cc head adapter, 10cc and 30cc syringes, and various size disposable needles. |
- Attach plant air supply. A source of 45 psi max. filtered air (5 to 10 micron filter) is recommended.
- Plug the AC Power cord into a 120 Volt, 60 cycle outlet.
- Push the Function Switch toggle to "steady" position. The indicator light turns on assuring that electrical power
is available in the Controller.
- Turn the Air Regulator knob until about 5 psi shows on the Air Gauge.
- Depress Footswitch for trial cycle and to "blow out" the pneumatic system to remove any foreign matter.
- Caution — Avoid the air blast from the front Air Connection and use safety glasses to avoid any eye injury.
- Push the Function Switch toggle to "Timer" position. The Indicator Light turns "ON".
- Rotate the Timer knob to any position for test at a setting between 0 to 2.5 seconds.
- Depress Footswitch for trial cycle. The air flow from the front Air Connection should stop when the Timer stops.
- When the test cycle has been satisfied, the unit is now ready for operation.
- To dispense, attach disposable needle to syringe, then attach syringe to the head adapter assembly.
- To turn unit off, flip the function toggle switch to the "OFF" position, and turn air regulator knob down to 0 psi.
|
| |
